Monday, October 26, 2009

Suz's Tool Trinkets

"Tool Trinkets" what a great idea. Now check out this scenerio, Ya know when you have all of your friends at the house and you are all making crafts such as stampin up cards or jewelry. Everybody has all of their "tools" out such as scissors, pliers, crimp pliers, tape dispensers and other items. They tend to get all mixed up and the next thing you know everybody is asking, "which one is mine". Well guess what, I have a solution to your little problem, "Tool Trinkets". They come in two sizes small which is a 2 inch circle and a large which is a 3 inch circle. So I have made some that are unique in a way that they have specific color beads OR you can get them customized with initials on them. This way everybody knows who's tools are who's. Isn't this a great idea.... so... if you buy now I have a special going on.......


BUY 3 GET 1 FREE... yes I said FREE............ so jump on this great idea.


They can also be used to identify your children's items such as lunch boxes, book bags and anything else that you want to identify as YOURS. When ordering your "TOOL TRINKETS" order them by number. First come, first serve.... they are going quick. Once these are gone I will be making more and I am also taking custom orders on specific colors. The beaded "tool trinkets" are selling for size small $6.00 and size large $6.50. The customized initial "tool trinkets" are selling for $7.00. Hurry up and get your new "TOOL TRINKETS" today.
ALL OF THESE ITEMS ARE SOLD AS 1 AVAILABLE, IF MULTIPLE OF THE SAME ARE WANTED, PLEASE EMAIL ME FOR FURTHER PRICING!!!!

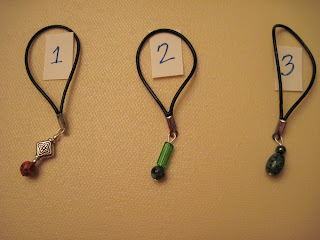
This first set of 12 are the small size 2 inches:

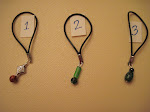
Example of how "tool trinkets" work:

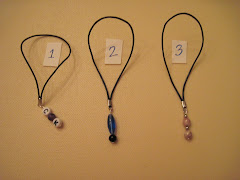
These are the large size 3 inches:


Remember when ordering your "tool trinkets" order them by number. A simple way to purchase your "tool trinkets" is to purchase them through paypal. I have attached an easy paypal button to do your purchasing. Simply hit the button and once I receive your payment and address, I will ship them out ASAP. Remember shipping is FREE.
If you have multiple orders or your own designs, please email me at suzannefmiller@gmail.com and I will ship them all together.


Small Brown & Silver bead #1


Small Green Beads #2


Small Green & Blk Bead #3


Small 2 Flower Bead #4


Small 4 Silver Design Beads #5


Small 1 Silver Bead #6


Small 4 Leaf Clover Charm #7


Small Flower Charm #8


Small Wishbone Charm #9


Small Green & Blk bead #10


LARGE Initial Beads (customized) #1


Small Blk bead #12


SMALL Initial Beads (customized) #1 1


Large Blue & Blk bead #2


Large Pink beads #3


Large Heart Charm #4


Large Sandal Charm #5


Large Silver Cat Charm #6


Large Purple beads #7


Large Silver Beads #8

Ok so remember if you have any questions, please feel free to email me at suzannefmiller@gmail.com

Thanks and Happy Beading!!!

Suz

Thursday, October 22, 2009

COMING SOON.............
WEEKLY SPECIALS AND FREE JEWELRY OFFERS.......


HAPPY HALLOWEEN!!!!!!! Boo!!!!!

Friday, October 16, 2009

Sterling Silver Pendant

Check out this cool pendant I made last week. I had this bead that has a whole through the center of it.

Then I took some 20 gauge wire and made a loop that would fit around my bead.

Then I took some 26 gauge wire and started wrapping it around the 20 gauge wire.

After I was done wrapping the wire I took the bead and placed it in the center of the loop that I had wrapped wire around. I started to wrap the 26 gauge wire around the outside, just about 2 loops and then I put the wire through the bead. On the other side I took the wire and attached it to the outside loop and then I went across the back of the bead to secure it and then attached the wire to the other side.


This is what it looks like when you are finished attaching the bead to the center.

Then I took that 20 gauge wire and started at the top and added silver beads to the outside of the wire loop. I then took the two wires at the top and twisted them to make a loop to attach a chain necklace. That is it... Beautiful huh!!!!


Sunday, October 11, 2009

NEW Byzantine Chain Bracelet

Hey Everybody, today is an awesome day.... I just finished making a new bracelet. Byzantine Chain Bracelet. It is a very easy, awesome bracelet to make. Went online this morning looking for some jumprings and found this tutorial to make this bracelet. http://www.thebeadman.com/byzantine.html

You can use any size and color of jumprings.

Items need are:

jewelry pliers
5mm gunmetal jumprings
6mm gunmetal jumprings
jewelry awl

Ok so what I did was take the first two jumprings 5mm and placed them on a piece of wire and then attached it to the vise to hold it while I made this bracelet.


Used the 6mm jumpring for finishing of this bracelet and a large gunmetal clasp.
Used another 6mm gunmetal jumpring for the other end.
Going to start to make a matching necklace and earrings. This bracelet took me about 4 hours to make. Isn't it great... this is a piece of jewelry that you will need to add to your personal collection of jewelry. I love it!!!! These would make excellent Xmas presents. Make sure you check out the tutorial at the website above.
Ok so I will be back later today posting more new jewelry.... it is a gorgeous day here in GA and I plan on working on jewelry projects all day long.
Happy Beading!!
Suzdezigns


Sunday, October 4, 2009

Looming finished

Ok so you take your piece of jewelry off of the loom.


Take the knot out of your one side of your jewelry and separate your threads. This is going to be the side where your loop is going to be. Take the 2 outter threads and place them aside and then you need to hide the other 8 threads.
Hide your threads by weaving them back into your piece of jewelry. This makes your piece strong and keeps the bracelet from falling apart.


One example to help hide your thead is by weaving your thread back through the bracelet length wise and then go back and forth width wise. After you have weaved your thread, you can then cut off the ends.

With your 2 strands on each side you want to take several beads and place them on your thread. Now how many beads you put on is how big your loop is going to be. I used 8 beads. Once your beads are on your thread then you need to take your needle and place one of the threads through it and then go back through the other set of beads, then you can start to hide that thread in the bracelet. Take the second thread from that same side and place it through the beads also and then secure that thread. Do the same to the other set of beads and then you will finish your loop.

Finished loop. Cool huh!!!!
Ok now for the other end of your jewelry.
Take those threads and separate them into 3 sets of 4. The 4 on the outter sides need to be hidden. The 4 threads in the middle is where your bead will be placed.
Ok so all of your outter threads have been hidden.
Ok instead of making a bead ball, I seen in a magazine the other day that somebody used a button to make their closures on their bracelets. So, in my piles of beads I found a bag of buttons and pulled this one out. Basically I took those 4 threads and separated them into 2 threads. I took 2 seed beads and placed them on the 2 threads. Then I took the button and placed the 2 sets of threads through the button holds. I then tied the threads and put them back through the button holds and then tied them off and cut my threads.

Waaaalaaaa!!!! Bracelet finished. So my button slides through my loop and is secure on my arm. Now this bracelet is tight on my arm which is ok. Ok so now I need to go figure out how to finish my Viking Knit necklace and bracelet... However, I think I will be back today with some new goodies that I purchased at Fire Mountain Gems and will be making a very cool bracelet.
See ya back here later.....
Happy Beading!!
Suzdezigns