Sunday, September 27, 2009

Viking Knit Necklace

Ok so, yes I should be finishing my looming bracelet but I get so sidetracked I can't believe it. So anyway here is my viking knit bracelet that I made earlier today.


I made a mistake on this first one by using 22 gauge wire to hold it. You need to use the same gauge wire that you are using for your necklace or bracelet. I will fix that later when I finish it.


Here is my tutorial: I am sure you can find a better one.

So first of all I you take your 26 gauge wire and wrap it around a round object four times.
Take it off the round object.
Next take the wire between your two fingers and squeeze it together.
Then you take the tail of the wire and wrap it around to secure it.
Then you spread out the four wires like a four leaf clover.
You then bend the wire in a cone shape and add you wire that you are going to weave with.
I used an allan wrench and vise grip. I took the allan wrench and placed it into the vise grip.
You then take your four leaf clover and put it over your allen wrench.
You take your extra piece of wire and start to weave it through your first loop. Just like a letter e.
See the letter e.

Then you go to the next loop and make another letter e loop.
Once you make your letter e's, your second level goes behind the letter e and makes another letter e loop.
This is what it looks like after about 20 rows. I am still not sure how many rows will make a bracelet and how many will make a necklace. When I got done weave my necklace it was about 13 inches long and then when I stretched it, it added about 5 inches to the length.
I then had my man make me a drill board out of wood and drill bits so I could pull my wire through it. By pulling your wire through these little holes you can make your necklace or bracelet as thin as you want to.

Here is my finished product. So now basically I just need to add a cone onto the end of the wire and secure it and it is finsihed. Like I said before...... this is just my tutorial and you can find a better tutorial online.
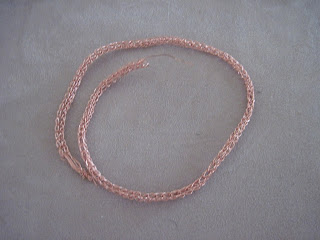
Happy Viking knitting...... it is fun... so now I have 2 projects that I need to finish.
Suzdezigns

Howdy there........

Well I went out to the bead shop yesterday and found my crystal white seed beads that I needed to finish my looming bracelet, which I will work on today. However... I was sidetracked by a book that I was looking at... it had a picture of wire wrapping on wire to make earrings. So, of course I had to try that idea so I made a necklace charm.


This is a very simple process you basically take an 8" piece of 18 gauge wire and fold it in half. Then you take a 5" piece of 18 gauge wire and place it in the center. Now you what you do is bend your 8" wire which is the outside wire and then lay your 5" wire in the middle. Now you want to make sure that when you lay your 5" wire on your 8" wire that you have about an inch
above the hard curve in your 8" wire.


Here is how you lay your wire out. What I did was put a clasp on the top of the wires to keep them together. Then you take any color 26 gauge wire and start to wrap it around the wires. You weave in and out between the wires. What I did was start with the first outside wire and wrap my 26 gauge black wire three times around the first wire and weave over to the middle wire and wrap it around two times and then went over to the third wire and wrapped it around like three times and then came back through the wires. I kept this process up and changed up how many times I would wrap it to keep it even. When you are finished wrapping your wire you just cut it off and hide it. ( just bend it around to the back and take your pliers and smash it tight. You then take your clasp off the top and that that inch of wire and bend it around. I made mine into a curl. You can change it up and make a hook and add a bead. Then I took the bottom wire that was hanging out and curled it and added a bead... so cute... oh yeah I also placed a decorative bead on the 18 gauge wire and then added my bead. I used decorative head pins.
This is so cute... I am making a necklace out of this one, however you can actually make this a pin. Just had a thought.. would this not be cute to shape your wire into a Christmas Tree and then use green wire to fill the center. Now you would still place a single wire in the middle so your wire is not straight across the center. You could then leave like 2 inches of wire over hanging the top and when you are finished shape that extra wire into a star. Then you could use head pins to make little hooks to decorate your tree with seed beads and ornaments. Oh my that sounds so cute... I may have to try that and then post it.
Ok, well I am out for now... I will also be working on my "Viking Knit" today.... I am so excited about that also... hmmmm I guess that is why I have so many projects started and so many not finished.. My mind just races with ideas.
One great thing that I do is.... I look through expensive cataloges and look at the expensive jewelry and then try to figure out how to make it. It is so much fun!!!!
Happy beading or wire wrapping....
Please post your comments and pictures. Would love to see your work.
Suzdezigns

Saturday, September 26, 2009

Looming......

Well, I went out looking for my seed beads yesterday and could not find the ones I want, so I will be venturing off to another bead store today. If I don't find what I need then I may have to switch gears and use some of my 1,000's of other beads that I have. I will finish it this weekend and post my pictures.


How awesome, while I was at a bead shop in Carrollton called Bead Happy (http://www.beadhappy2u.com/), and I found a class on "Viking Knit Necklaces". I have never heard of this type of wiring. I am so interested so I came home and looked it up on the internet, here is a website to check it out (http://www.beadhappy2u.com/). I have actually checked out the tutorial on this website (http://www.youtube.com/watch?v=wfsyTn9XCsE), check out this guys video it is awesome. So as I am on my journey today to look for my seed beads..... I will be picking up some 28 gauge wire and will try to make a bracelet. I will post later what I find out.

Happy Beading.....
Suzdezigns

Wednesday, September 23, 2009

Looming jewelry making continues.....


Ok so I have finished my bracelet, isn't it pretty. Ok so remember as you are looming and adding threads to your bracelet for more beads you will have pieces of thread hanging on the sides of your item. These pieces need to be weaved back into the bracelet. Simple take your needle and thread it and hide it in the rows of beads. Also, a little tip, as you are beading on your loom and you add thread to continue to bead, you can simple weave those threads into your beads as you go. As you see I only have one thread left on the side to weave back into the bracelet. This also makes your beads secure and your bracelet.
Ok so this weekend I will be going to the bead store to get more beads and then I will show you how to finish your bracelet. Basically what you are going to do at the ends are take the outter three strands and tie a looped knot to hold them for later. The rest of the strands need to be weaved back into the bracelet to secure them. Once those other strands are hidden you take the three strands on each side and cover it with beads to make a little loop. Then on the other side you hide all of the strands on the outside and leave like three in the middle and cover that with beads and make a big bead ball and tie it off. Then your closure is the loop and the bead ball will slip thru that loop to secure your bracelet on your wrist. I know this is all confusing, but once I get my beads I will post pictures of how it is all done.
Happy beading!!!!
Suzdezigns

Saturday, September 19, 2009

Looming jewelry making!!!!

I am so excited about this looming... if you don't have one you need to purchase one. They are awesome and fun!!! I am in the process of making a bracelet. You can take a piece of draft paper and draw your design and then make it as a bracelet or even a necklace.

Items needed are:
a loom
nimo beading thread
seed beads of your choice
a thin beading needle


Ok so I am using blue and crytal white seed beads. You need to get a very flexible beading needle.


The looming is fun!!! First you take your nimo beading thread and cut them to the length that you want. You can even make a belt if you want to.


The loom has these coils at each end and you place your nimo thread across both ends of the loom. You can make your necklace, bracelet, or belt how ever wide you want. I used 12 pieces of thread and stretched them across the loom. At the end of each loom is a screw that goes into the wood barrel. That is where you tie your nimo threads. Now on the end that you start with you make that thread short and tight. Now on the other end if you want your item to be longer than the loom you just take that extra thread and tie it around the screw and as you work your way across the loom, you would untie your beginning screw and put your bead over the coil to continue with your length. I am just making this bracelet about 7 inches long.


This is the end of the loom that you start your beading on. See how I took all of the threads and tied them together and then wrapped them around the screw. You need to make sure you have extra thread on each end to end your beading and hook on your closure.


This is the other end of the loom. See how I have soooo much extra on this side. And I have tied it tight around the screw. This way your threads are firm on top for beading.


After you have secured your thread it is time to start beading. You take your nimo thread and put it in your needle eye. You then take the other end of your thread and tie it on to the far right thread by making a small knot. Don't make the knot to big just enough to hold it because you can come back at the end and take that extra thread and go back through the beads to secure it.


So now that you have your thread on the loom, you count your bead spaces that are needed. Since I have used 12 threads my bracelet will be 11 seed beads wide. So I will be using 11 beads each time. You place those 11 beads on your needle to start your design. If you look at the pictures above you will see that I started out with a plain row of crystal white beads and then started out my design.


Ok so now that you have your seed beads on your needle you take those seed beads with thread under the threads. You then press them up firmly against the nimo thread, so that each bead goes into its space.


Ok once your seed beads are in place you take your needle and go through the beads ABOVE the threads. This secures your beads onto the threads. So basically you start your beads under the threads, push them up tight against the threads and then go from the top across the beads to secure them.


So get beading and I will get back to you with pictures on how to finish it.

Happy Beading!!!!!!!!

Sooooo Busy!!!!!

Sorry I have not added anything new to my blog for a long time.... but I have been so busy working on homework and watching Grey's Anatomy. The new season starts next week and I am so excited.. so I have been catching up on last season so I am ready to watch. Anyway, I hope to working on some jewelry making this weekend and will add some new stuff to my blog.